Cookbook Reviews

Sunday, December 30, 2012

Slow Cooker Apple Crisp

Don't let the picture fool ya...this stuff is TASTY!

Adapted: Allrecipes.com

For Thanksgiving, I did a whole bunch of cooking and wanted dessert to be really simple and not to have to play with it. As my standard practice, I started stumbling in my favorite recipe sites for anything dessert and crock pot. This one glared at me and I knew it would be the Blackburn Thanksgiving dessert. It did not disappoint. The apples were loaded with cinnamon and the topping was extra special with its' walnuts loaded into it.

Note: I served this with a French Vanilla ice cream. I took the picture prior to adding it so the picture would show how it looks.

Ingredients:

1 cup all-purpose flour


The Chocolate Covered Banana Tini


I wanted to figure out a way to combine two things that I love. The first being the tini and the second being a chocolate covered banana. I could eat those things by the dozen when I was growing up and let's just say that I have had to slow down since I have gotten older! So, I set out to play and this is what I developed. My next plan is to use the base for a Banana Cream Pie Tini...wish me luck!

Ingredients:

1 oz Vanilla Vodka
1 oz Chocolate Vodka
1.5 Banana Liqueur
1.5 oz Cream de Cacao
1.5 oz cream/half-half

Directions:

1) Prepare a very chilled, large tini glass by swirling chocolate sauce, such as Hershey's, in the glass. Return to freezer while preparing the tini.

2) Place all ingredients in a chilled metal shaker filled with ice. Shake for no less than 60 seconds.

3) Strain into glass and garnish with canned whipped topping, chocolate sauce and banana slice(s) !

Cranberry Chicken


I have been cooking this dish for so long that even if I was pressed, I couldn't tell where it came from. I love this incredibly simple dish that if I am having a really lazy cooking day that I simply head to it. Even the rice and frozen corn it is partnered with is simple to make.

So, here we go:

6-8 Chicken Thighs (I have seen recipes using b/s chicken breasts)
1 can WHOLE cranberry sauce
1 packet dry onion soup mix
1 cup french dressing

Directions:

1) Liberally spray a 9x13 pan with cooking spray

2) In a bowl, mix the next 3 ingredients together and pour over chicken.

3) Cover with aluminum foil and bake in a 350 degree oven for 45 minutes.

4) Serve over rice with some of that scrumptious sauce served over it and some corn on the side. Easy Peasy!

Saturday, December 29, 2012

My Experiment with Homemade Tamales

Sorry for the shadows!


Know me for a second, you know I am a LOVER of Hispanic cooking, particularly of Mexican cooking. I love and am fascinated by the Mexican heritage so I stalk my poor friends who are of Mexican descent, who cook with the ferocity that I cook, for tips on cooking, seek out Mexican recipes, study Mexican spices...you name it. I also refuse to go the shortcut route on Mexican cooking, even with my Agave Nectar Margarita a commercial margarita mix isn't allowed in my home.

One of my favorite dishes is the tamale. I LOVE 'em, but have always been incredibly intimidated by preparing them. In the 1990's, I worked for a company that a woman by the name of Rosa Hernandez, who to supplement her income sold homemade tamales. I was always in for 2 dozen a month. When I left the company, that was the end to homemade tamales for me. As I would ask my friends to teach me how to make them, I would get "they are too time consuming. I don't make them." So, alas, I put my love of tamales on the back shelf of my mind.

One day, I decided that I was going to take the bull by the horns. I WAS going to overcome my fear of making them. After I found a recipe for them on Allrecipes, I purchased the corn husks and the mesa, but then my fears of screwing them up crept in again. I put everything in my cabinets for a later day.

As I was recipe searching for meals, this Homemade Tamales recipe popped up again. That was it...CARPE DIEM...Seize the Day...I was on. The rest of the ingredients were added to my shopping list and I was on my way. I am not a fan of lard so I stopped by my Jewel butcher and asked her if lard could be interchanged with shortnening. I explained to her that I was making tamales for the first time and wasn't a fan of them. Now, Suzanna told me that she actually makes them frequently and told me that I could use Canola oil instead of either of them. I was really happy at that point. One thing she had warned me about was the "wrapping of the tamale in the corn husk. As someone who has to use a toothpick to secure my cabbage rolls, I felt my insecurity creeping back in. This time, I wasn't going to let it stop me though.

So I set off and here was the outcome...

Ingredients:

Tamale Filling:
1 1/4 pounds pork loin
1 large onion, halved
1 clove garlic
4 dried California chile pods
2 cups water
1 1/2 teaspoons salt
1 cup sour cream
 
Tamale Dough:
2 cups masa harina
1 (10.5 ounce) can beef broth
1 teaspoon baking powder
1/2 teaspoon salt
2/3 cup Canola Oil
1 (8 ounce) package dried corn husks
 
 
Directions:
 
1) Place pork into a Dutch oven with onion and garlic, and add water to cover. Bring to a boil, then reduce heat to low and simmer until the meat is cooked through, about 2 hours.
 
2) Use rubber gloves to remove stems and seeds from the chile pods. Place chiles in a saucepan with 2 cups of water. Simmer, uncovered, for 20 minutes, then remove from heat to cool. Transfer the chiles and water to a blender and blend until smooth. Strain the mixture, stir in salt, and set aside. Shred the cooked meat and mix in one cup of the chile sauce.
 
3) Soak the corn husks in a bowl of warm water. In a large bowl, beat the oil with a tablespoon of the broth until blended. Combine the masa harina, baking powder and salt; stir into the oil mixture, adding more broth as necessary to form a spongy dough.
 
4) Spread the dough out over the corn husks to 1/4 to 1/2 inch thickness. Place one tablespoon of the meat filling into the center. Fold the sides of the husks in toward the center and place in a steamer. Steam for 1 hour.
 
 
Tamales without sauce and filling exposed
 
5) Remove tamales from husks and drizzle remaining chile sauce over. Top with sour cream. For a creamy sauce, mix sour cream into the chile sauce. 
 
So, I did it! I made my first batch of tamales. What was my take? I found the process of making tamales to be less intimidating, but can see why my friends say it is tedious. On that note, I will be doing this again. It took me back to my Rosa Hernandez days.
 
I partnered it with my Mexican Rice and the simple slow cooker refried beans recipe to hit The Pub and Grub recipe base really soon!  
 
As for this recipe, though, I will continue to use this one but make my changes to it. I like my foods spicy and found this recipe to be a bit bland. My husband, on the other hand felt it was restaurant quality. When Suzanna asked me how my tamales went, I explained my issue with the blandness and she explained the pepper to use instead of the California pepper I used. So, next time I will use that pepper. I will also be trying my hand at the beef tamale recipe. I will also set aside a day and make the by the dozens and freeze them.
 
 I am no longer intimidated by the tamale!


Beach Side Spicy Shrimp


In tailgating, it is simply common knowledge that I will have some form of a seafood, normally shrimp, hanging around. As a result, I am always on the lookout for some tasty morsels that can be included on my spread.

When I saw this one on A Bachelor and His Grill, I knew it would make an appearance somewhere, I just wasn't sure when. When I decided to make Grilled Creole Steak with Creole Gorgonzola Butter and my crock pot baked potatoes for the Bears/Packers game, I knew I found its' time to shine. Shine it did.


Now, on his site, David Olson has his shrimp peeled and on skewers. Because shrimp are so temperamental in cooking and can go from scrumptious to rubber in the snap of fingers, plus shrimp are so easy to peel, I keep the shell on and grill individually. 

Every piece of these shrimp were GONE! They had a nice flavor to them that really either could complement a main dish or be one on its' own served with a creole spaghetti.

On a separate note, this rub is one that I will be using on other forms of seafood. The taste in this rub was spectacular and versatile.

One last point in how I served these. David had squeezed the lemon over the shrimp after they came off the grill. Because I kept the shell on mine, I served mine with lemon wedges for my family to squeeze the lemon juice on after peeling.

So, here we go:

3 T. olive oil
1 t. jarred garlic
2 t. ground cumin
2 t. chili powder
2 pinches granulated sugar
1/2 t. SMOKED paprika
Salt / black pepper & crushed red pepper flake to taste

3 Lbs large shrimp
Lemon wedges

Directions:

1) In a small mixing bowl thoroughly combine first 7 ingredients ( all but shrimp & lemon).

2) Add Shrimp to mixing bowl with spice rub ensure each shrimp is well coated. Allow to marinade for a good 1-2 hours.

3) Place over HOT Grill Grates for 4-6 Minutes, TOTAL! Turn after 2-3 Minutes.

4) Set aside to REST for 2-3 Minutes


Grilled Steak with Creole Gorgonzola Butter


Bears tailgating is taken very seriously in the Blackburn home. Have it be an late or evening game and SERIOUS chowin' is about to commence! So, I am always on the lookout for different, extravagant recipes to celebrate the Monsters of the Midway.

Shuffling around Pinterest, I stumbled upon a blog written by Creole Contessa , who cooks up some mean stuff and has a creole twist to boot! I was hooked. So that was it, her Pan Roasted Steak with Gorgonzola Butter was being crowned the winner in the meal choice to celebrate our old rivalry with the Green Bay Packers. Unlike her recipe, though, I am a griller. If it is a steak, nine chances out of ten, it is seeing a grill versus a fry pan. I partnered with Beach side BBQ Shrimp and crock pot baked potatoes (both recipes can be found on The Pub and Grub Forum) for the perfect meal.


Ingredients:

3 rib eye, T-bone or strip steak

½ T.. creole seasoning

½ T. black pepper

½ T. garlic powder

½ T. onion powder

½ T. chili powder

1 t. paprika

1 lemon, zested, juiced

1 lime, zested, juiced

½ stick of SALTED butter

3 tbsp. extra virgin olive oil

Gorgonzola Butter (recipe below)


Directions:

1) Rinse steak and pat dry. In a glass baking dish place steak and pour 3 tbsp. of olive oil over steak, rub into steak on both sides. Mix seasonings together and sprinkle steak rub on both sides of steak, rubbing into steak.


2) Zest lemon and lime and sprinkle zest on top of steak. Juice lemon and lime and pour over steak. Marinate steak in the refrigerator for at least 2 hours if possible. Bring steak to room temperature for least 30 minutes prior to cooking.  While steak is marinating, make Gorgonzola butter and refrigerate.


4) Combine melted butter and olive oil. Prepare grill. While steaks are grilling, brush with melted butter and olive oil combo. Grill steak to desired temperature. Slice Gorgonzola butter onto steak.
 
3) Place steak in a  warmed oven until butter is almost melted.


Gorgonzola Butter:

1 stick UNSALTED butter, softened

4 oz. Gorgonzola cheese

1 green onion, minced

¼ tsp. black pepper

¼ tsp. creole seasoning

Directions:

1) Add butter to a bowl, smash with the side of a spoon. Add Gorgonzola cheese, minced green onions, black pepper and creole seasoning. Mix well. Refrigerate until ready to use.

Friday, December 28, 2012

Oven Fried Parmesan Chicken


adapted: Allrecipes.com

I had made the mistake of being pretty unprepared for dinner one night, including even taking meat out of the freezer. When it dawned on me, I realized the only thing that I had that could be prepared quickly were chicken breasts that were individually packaged. I then went on a search for what I could do with them that was new and different. Of course, Allrecipes came to the rescue and I found this version of a chicken Parmesan.

Ingredients:

1/2 t. jarred garlic
1/4 lb butter melted
1 cup dried Italian bread crumbs
1/3 cup grated Parmesan cheese
2 T. Fresh parsley
1 t. salt
1/8 t. ground black pepper
5 boneless chicken breasts

Directions:

1) Preheat oven to 350 degrees

2) In a shallow bowl, combine the garlic and butter. In a second bowl mix together the bread crumbs, Parmesan cheese, parsley, salt, pepper

3) Dip the chicken in the butter and then the crumb mixture.

4) Bake in oven for 40 minutes. Serve with pasta and sauce, if desired

Skier's Stew


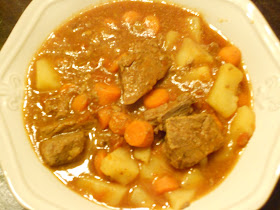
Anyone who knows me for even the shortest amount of time knows that I loathe when temperatures drop and the coldness sets in. One redeeming quality to the short days and frigid Illinois farm field blowing snow is this stew. I found it in a cookbook that I had purchased from Taste of Home magazine years ago, but it is one that I make several times per year. What makes this stew special is that it slow cooks for 5 hours in the oven so that  the meat can be cut with a spoon. I serve it with either biscuits or yeast rolls from my bread maker. It is such pure simplicity and down home goodness that it warms from the inside out.

So, here we go:

Ingredients:

2 lbs stew meat cut into 1 inch chunks
6 large potatoes, peeled and cut into 1 inch chunks
25 baby carrots, cut into chunks
1 can diced tomatoes, drained and juices reserved in a 2 cup measuring cup
1 can (15oz) tomato sauce
1 envelope dry onion soup mix

Directions:

1) In a large dutch oven, layer half the potatoes, meat, carrots and tomatoes. Repeat layer

2) Add water to reserved tomato juice from drained tomatoes to equal 1/2 cup of liquid. Pour over stew.

3) Pour tomato sauce and top with the onion soup mix. DO NOT STIR

4) Place in an oven that has been preheated to 250 degrees and bake for 5 hours.

5) Remove from oven and stir. Serve with biscuits or rolls.


Monday, December 17, 2012

The Grinch


I love entertaining at the holiday season and am always on the search for fun little recipes that will bring some fun to my parties. I found this little bad boy on Drinksmixer.com. Although, the original recipe packed 3 oz of vodka, in my humble opinion, undrinkable, I felt it had potential. So I set out to make it drinkable. Beware though, these can sneak up on you as they taste more like a kool-aid versus an alcoholic drink.

Unlike its' namesake, there is nothing cold hearted about this tasty libation!

Here is what I came up with:

Ingredients:

1.5 oz vodka
1.5 oz Midori
1.5 oz  Triple Sec
2 oz  Sweet and Sour

Directions:

1) Place all ingredients into a metal shaker filled with ice. Shake and pour into a well chilled glass.

2) Decorate as desired.

Thursday, December 13, 2012

Stephanie O'Dea's Chocolate Frito Candy


I have been taking time away from The Pub and Grub due to getting Christmas trays ready for gift giving. I had to pop back in and post this WONDERFUL recipe which is a frequent request from others.

One of my FAVORITE cooks is Stephanie O'Dea from the Make It Fast, Cook It Slow slow cooker cookbook series. This series is a frequent go-to for me and this is a recipe that I have practically memorized. Now, I don't follow Stephanie's gluten free lifestyle, so mine includes ingredients that can be found in any supermarket.

This recipe is SO simple to make, it isn't even funny. Stephanie makes a comment at the bottom of the recipe that she sneaks pieces of this candy into her robe pocket. At first, I was like I wouldn't expect her to say less...until I tried it. I can see it now. This recipe is sweet, salty, peanutty...all my favorites! Just a lil note. At this time, when I make this, I triple and quadruple the recipe...so that is what the picture above is showing. I think the recipe, as shown below, is maybe about 4 cups of candy.

So, here we go!

Ingredients:

2 cups Fritos/corn chips, smashed
2 cups pretzel sticks, smashed
1 stick butter (8 T.)
1/2 cup brown sugar
2 T. Peanut Butter
1 bag semi sweet chocolate chips
1/2 cup dry roasted peanuts

Directions:

Crushed pretzels and corn chips


1) Place butter, brown sugar, peanut butter and chocolate chips in 6 qt crock pot. Cook on low for 1 hour (2 hours tops).


2) Stir and add corn chips, pretzels and peanuts.

3) Prepare a 9x13 cookie sheet with aluminum foil and spread chocolate mixture.

4) Place in a cool place for about 1 hour or until hardened.

5) I have found cutting in 1 inch strips makes it easy to cut the sized pieces I like to give.


Wednesday, December 5, 2012

The Blueberri Tini


I was a happy lil' camper the other day. In searching out a tini recipe, I stumbled upon a restaurant site that had no less than 50 tinis. The Blueberry Martini was one which was listed so I decided to play with it and developed this spectacular little drink. Simple yet elegant.

As I say on a regular basis...the key to a great tini is cold equipment whether it is the shaker or the glass. Just take a look at the ice crystals on this bad boy.

So here we go:

Ingredients:

1.5 oz Blueberry juice ( I used Ocean Spray)
1.5 oz Blueberry vodka
1 oz Triple Sec
.5 oz FRESH SQUEEZED lime juice

Directions:

1) In a metal shaker, fill half way with ice and pour all ingredients into shaker.

2) Shake vigorously for 60 seconds.

3) Strain into a very well chilled martini glass. Serve with fresh blueberries if desired.

Monday, December 3, 2012

Cranberry Christmas Punch


Adapted: Creative Culinary

I had stumbled upon a recipe for a Christmas gin drink on Pinterest and thought it looked interesting. Now, we are not huge gin drinkers in the Blackburn house so when I made the drink, the gin flavoring was overpowering to me, but I knew that it had potential if I adjusted the flavorings a bit. I set off on Thanksgiving day to see what I could do. My family thought this was definitely a winner!

So, here we go!:

Ingredients:

Cranberry Simple Syrup
3/4 cup sugar
3/4 cup water
1 cup fresh cranberries
 
Drink
1 lemon, cut into wedges
1/2 orange, cut into slices
1 1/2 cups HIGH QUALITY dry gin, such as Bombay Sapphire, Beefeater or Tangueray
4 cups chilled Ginger Ale
 
Directions:
 
1) In a small saucepan over medium heat, combine syrup and water and stir until sugar is dissolved. Add cranberries and stir constantly until berries start to burst. I think mine took about 7 minutes to get them to where I wanted. Set aside.
 
2) In a pitcher or a punch bowl, muddle the lemon and orange. Add the gin and muddle a bit more. Add the Cranberry Simple Syrup and stir.
 
3) Add the Ginger Ale and ice. Stir and serve immediately. Be sure to add some of the fruits and garnish with additional lemon or orange slices.  It really adds to the prettiness and flavoring!

German Pancake with Buttermilk Syrup


Partnered with Paula Deen's Perfect Scrambled Eggs and Bacon!


I love doing breakfast for dinner. It is a nice break from always having meats and such at dinner time. I have been trying to get away from doing the same old stuff and stumbled upon this very easy dish on Allrecipes. We ate the entire pan of this it was so tasty. The recipe makes a 9x13 pan with TONS of syrup. My husband said it almost tasted like a breakfast pastry.

So, here we go!:

Ingredients:

Pancake:

6 Eggs
1 cup milk
1 cup flour
2 T. MELTED Butter

Syrup

1.5 cups WHITE sugar
3/4 cup buttermilk
1/2 cup butter
2 T. light corn syrup
1 t. baking SODA
2 t. vanilla extract

Directions:

1) Pour melted butter in a 9x13 pan. Set aside

2) In a blender, combine eggs, milk and flour until smooth and pour into 9x13 pan. Place in a 400 degree oven and bake for 20 minutes. One of the main complaints that I saw on Allrecipes focused on the blending. I made sure mine was WELL blended.

3) While pancake bakes, combine first 5 syrup ingredients in a saucepan and boil for 7 minutes stirring constantly until smooth. Add the vanilla and stir again. Now, for some reason, my psycho syrup came out as white. It was still really tasty though!

4) To serve, cut a square of pancake and spoon syrup over pancake. Very different!

Pot Roast


Adapted: The Food of Love Blogspot

I just recently joined RecipesUS.com and one of the recipes that immediately jumped out at me was this Pot Roast. Now, being the good Irishmen that my husband and son are, they love meat and potatoes. This roast was LOADED with both and produced results that were restaurant quality. Now, the prep and cook time take a bit longer, so give yourself plenty of time. We had NO leftovers!

The gravy on this roast was SPECTACULAR. I will never make a pot roast another way. OK..that might be taking it a bit far as we love new pot roast recipes in the Blackburn household. This is a PERFECT Sunday dinner though!

So, here we go!:

Ingredients:

RUB
3 tbs cornstarch
4 tsp onion powder
2 tsp light brown sugar
2 tsp salt
1 tsp pepper
1 tsp garlic powder
1 tsp instant espresso powder (this is found in your coffee aisle of your supermarket)
1 tsp dried thyme
1/2 tsp celery seed

Pot Roast:
2 onions, quartered
1 lb SMALL red potatoes, quartered
16 BABY carrots, peeled and cut in half
2 bay leaves
2 tbs soy sauce
1 (3 lb) boneless beef chuck-eye roast

Directions:

1) Preheat oven to 300 degress and place the rack in the center. Prepare Rub and coat roast with it.


2) Tear off several very large sheets (30x18 inches) of HEAVY aluminum foil and fit them into a roasting pan.

3) Place all the veggies in the center of the pan, drizzle the soy sauce over the veggies and place the roast on top of them. I sprinkled any leftover rub over the meat. Then, TIGHTLY seal the foil and place in oven for about 4.5 hours.

4) When finished remove the meat from the packet and allow to sit for 10 minutes. Arlene from The Food of Love recommend slicing it, but I cut it into chunks. Drizzle with the gravy and have gravy to pass. It partnered BEAUTIFULLY with a Pinot Noir!